Loading...
play.sapling.gg
Click to copy IP
Welcome to Sapling SMP
Sapling is a cozy, non-competitive Minecraft survival server built around community, creativity and fun. It's a welcoming place to build, explore, and enjoy and enjoy Minecraft together.
This is the official guide for Sapling. Here you'll find information, guides, and tips and tricks for everything on Sapling!
Server IP: play.sapling.gg
Bedrock Port: 19132
Website: https://sapling.gg/
Voting: https://sapling.gg/vote
Store: https://sapling.gg/store
Discord: https://discord.gg/DPmNfGwXNt
Sapling SMP is available on all platforms. Whether you're on PC, Windows, Xbox, PlayStation or Mobile, you're welcome to jump into the server. Getting started is easy and this page will guide you through everything.
Player Market
/market Opens the main player market menu./offer <price> Places the item you are holding into the player market.Help Commands
General Commands
/claim Opens the claim menu/rtp Randomly teleport to a random location./warps Show the list of server warps available./msg [player name] [message] Send a private message to another player./msgtoggle Enable/Disable recieving messages from another player./tptoggle Turn off teleportation requests./rewards Opens the daily rewards menu/vote Opens the server vote menu, this is where you can vote and view progress on your voting ranks.Home Commands
/home [home name] Teleports you to your home location./homes List all your homes/sethome [home name] Sets your current location as your home./delhome [home name] Deletes one of your set home locations.Player Advancement Commands
/jobs Opens the jobs menu./skills Opens the skills menu./quests Opens the quests menu.Economy Commands
/bal or /balance Views your current money balance./pay [player name] [amount] Gives money to another player./trade [player name] Trade money and or items with another player./points Views your current saplings balance./shop Open the shop.Teleport Commands
/tpa [player name] Send a teleport request to another player./tpahere Sends a teleport request to another player to teleport to your location./tpa cancel Cancels a teleport request that you sent to a player,/tpa accept Accept a teleport request from another player./tpa deny Deny a teleport request from another player.Sapling is a community-driven SMP server. Linking your Discord account is not required, but we strongly recommend it. It helps us keep this community a safe, welcoming and respectful place for everyone, and it also helps us get to know the community better. This process is simple as follows:
How to link?
To link your Minecraft account to Discord.

Once connected to the server, paste the command containing the sync code into the server chat.
What perks does linking unlock?
Discord access
Server Perks
This category gives you access to our supporter ranks. Ranks will give you some new perks, commands and kits!
| Feature | Acacia | Oak | Blossom |
|---|---|---|---|
| Price | $7.99 | $19.99 | $29.99 |
| Kit | Acacia Kit | Oak Kit | Blossom Kit |
| Reward | Weekly | Weekly | Weekly |
| Player Glow | ✅ | ✅ | ✅ |
| Tag & Color | ✅ | ✅ | ✅ |
| Vaults | 10 | 12 | 14 |
| Homes | 10 | 12 | 14 |
| Player Warps | 10 | 12 | 14 |
| Claim Flags | 6 | 12 | 18 |
| Market Item Offers | 10 | 12 | 14 |
| Minion Slots | 70 | 100 | 140 |
| Player Shelf Shops | 70 | 100 | 140 |
| Sign Colors & Formatting Codes | ✅ | ✅ | ✅ |
| /recipe | ✅ | ✅ | ✅ |
| /craft | ✅ | ✅ | ✅ |
| /grindstone | ✅ | ✅ | ✅ |
| /smitingtable | ✅ | ✅ | ✅ |
| /stonecutter | ✅ | ✅ | ✅ |
| /hat | ✅ | ✅ | ✅ |
| /near | ✅ | ✅ | ✅ |
| /feed (24 hr cooldown) | ❌ | ✅ | ✅ |
| /disposal or /trash | ❌ | ✅ | ✅ |
| /top | ❌ | ✅ | ✅ |
| /anvil | ❌ | ✅ | ✅ |
| /loom | ❌ | ✅ | ✅ |
| /itemrename | ❌ | ✅ | ✅ |
| /nickname | ❌ | ✅ | ✅ |
| Nickname Color Codes | ❌ | ✅ | ✅ |
| Nickname #HEX Codes | ❌ | ❌ | ✅ |
| /fix (24 hr cooldown) | ❌ | ❌ | ✅ |
| /heal (24 hr cooldown) | ❌ | ❌ | ✅ |
| /pweather | ❌ | ❌ | ✅ |
| /ptime | ❌ | ❌ | ✅ |
| /zheads | ❌ | ❌ | ✅ |
| /enderchest | ❌ | ❌ | ✅ |
| /extinguish | ❌ | ❌ | ✅ |
Acacia Rank
Oak Rank
Blossom Rank
Saplings are the server's cosmetic currency. Earn them by playing and voting, then spend them in the Sapling Shop to customise your appearance on the server!
Earning Saplings
There are two ways to earn Saplings:
Voting - Vote for the server using /vote to earn 10 Saplings per vote. Voting also supports the server and helps us grow!
Levelling Up - Every time you level up, you automatically receive 10 Saplings as part of your level-up reward.
Checking Your Balance
Run /saplings or /saps to check how many Saplings you currently have.
The Sapling Shop
Spend your Saplings on cosmetics in the Sapling Shop. Open it with /sapshop.
The shop is split into multiple categories:
Land claiming is designed to be simple and easy to use. Everything is built around an in-game menu, making claim creation and claim management quick and straightforward. To get started, all you need to do is run /claim.
Land Claim Menu
Use the following command to open the main claim menu:
Other Ways to Claim
If you prefer the golden shovel claiming system, you can use:
For extra help, you can also watch this guide: How to create a secure claim using the golden shovel.
Commands
If you prefer using commands instead of the GUI menu, see below for the full list of claim commands.
/claim create [radius] — Create a new claim.
Aliases: /claimcreate, /gpclaimcreate
/claim list [parentID] — Open the claim list menu.
Aliases: /claimlist, /claimslist
/claim info [claimID] — Open the claim info menu.
Aliases: /claiminfo
/claim claimblocks — Open the claim blocks menu.
Aliases: /gpclaimblocks
/claim purchase [amount|selector] — Purchase claim blocks or open selector.
Aliases: /gpclaimpurchase
/claim sell [amount|selector] — Sell claim blocks.
Aliases: /gpclaimsell
/claim tp <claimID> [player] — Teleport to a claim.
Aliases: /gpclaimtp
/claim warp <claimID> — Warp to a claim.
Aliases: /gpclaimwarp
/claim fly — Toggle claim flight.
Aliases: /gpclaimfly, /claimfly
/claim leave <claimID> — Leave a claim.
Aliases: /gpclaimleave
/claim unclaim <claimID> — Unclaim your claim.
Aliases: /gpclaimunclaim
/claim trust player — Open trust menu or trust player.
Aliases: /gpclaimtrust
/claim distrust player — Open distrust menu or distrust.
Aliases: /gpclaimdistrust
/claim trustlist [claimID] — Open trust list.
Aliases: /gpclaimtrustlist
/claim trustgui [player] — Open trust GUI.
Aliases: /gpclaimtrustgui
/claim invites [claimID] — Manage claim invites.
Aliases: /gpclaiminvites
/claim accept [claimID] — Accept a claim invite.
Aliases: /gpclaimaccept
/claim decline [claimID] — Decline a claim invite.
Aliases: /gpclaimdecline
/claim revokeinvite [player] — Remove pending invite.
Aliases: /gpclaimrevokeinvite
/claim transfer [player] — Transfer claim ownership.
Aliases: /gpclaimtransfer
/claim trustset <player> <claimID> [perm] — Set trust with optional permission (e.g., 10m, 1h).
Aliases: /gpclaimtrustset
/claim kick player [claimID] — Kick a player from the claim.
Aliases: /gpclaimkick
/claim ban player [claimID] — Ban a player from the claim.
Aliases: /gpclaimban
/claim unban player — Unban player from the claim.
Aliases: /gpclaimunban
/claim whitelist player [claimID] — Whitelist a player from the claim.
Aliases: /gpclaimwhitelist
/claim unwhitelist player [claimID] — Remove player from whitelist.
Aliases: /gpclaimunwhitelist
This elevator system is incredibly simple and intuitive to use. Just two basic actions control your vertical movement!
How to Build an Elevator
That's it! Your elevator is ready to use.
How to Use It
Jump into the jobs system and start earning money right away! You can choose from 11 different professions including Miner, Farmer, Builder, Fisherman, Enchanter and more. Each with its own unique rewards and progression path.
Why Join a Job?
| Job | Starting Pay | About this Job |
| Beekeeper | $5 per each bee you breed |
Levelling up by breeding bees, but don't drink any honey!
|
| Breeder | $0.01 per each animal you breed | Levelling up by breeding animals |
| Builder | $1.20 per every 12 blocks placed | Level up by placing blocks |
| Enchanter | $0.25 per each item enchanted | Level up by enchanting items |
| Farmer | $0.25 per each crop farmed | Level up by farming crops |
| Fisherman | $5 per each fish caught | Level up by fishing |
| Lumberjack | $3 per each log chopped | Level up by chopping wood |
| Miner | $1.20 per 10 blocks mined | Level up by mining |
| Slayer | $0.10 per each mob killed | Level up by killing mobs |
| Smelter | $0.25 per each item smelt | Level up by smelting |
| Toolsmith | $2 per each item crafted | Level up by crafting tools |
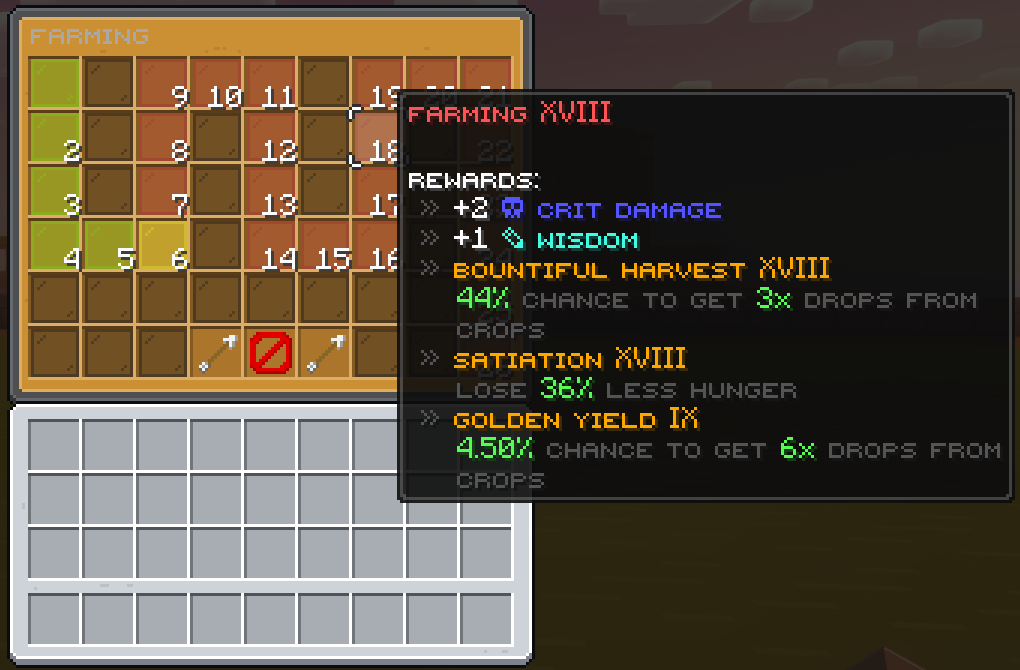
Skills are a fun way to progress your character as they allow you to become stronger and unlock special abilities. You will earn skill related XP within the related skill.
Getting Started with Skills
Firstly, to access your skills use the command: /skills
This command will open the skills menu, which shows:
|
Skill Menu |
Skill Progression Tree for Farming |
| Skill | What the skill does |
|---|---|
| ⚗️ Alchemy | Craft and use potions to enhance gameplay, combat, and utility effects. |
| 🏹 Archery | Improve ranged combat with bows and crossbows for precision and damage. |
| 🛡️ Armory | Boost armor effectiveness and durability for better protection. |
| ⚔️ Combat | Enhance melee fighting capabilities, including damage and critical hits. |
| ✨ Enchanting | Increase enchant success rates and unlock advanced enchantments. |
| 🧭 Exploration | Gain bonuses for traveling, discovering biomes, and navigating terrain. |
| 🌾 Farming | Improve crop yield, growth speed, and farming efficiency. |
| 🎣 Fishing | Unlock rare catches and improve fishing speed and loot quality. |
| ⛏️ Mining | Increase ore yield, mining speed, and rare drop chances. |
| 🪓 Woodcutting | Boost log harvesting speed and chances for bonus drops. |
How to gain Skill XP
Gaining skill experience is simple, performing relevant activities related to the skill.
For example:
At the top of your screen, you'll see a progress bar that indicates how much XP you need to advance to the next level.
Progression
As you gain experience in a skill, your level increases. Each level unlocks:
Understanding Skill Stats
Stats are a core part of the skills system. They improve your characters abilities. Each stat can be levelled up on its own and can provide specific bonuses.
⚔️ Strength
About: Combat helps to increase the damage you deal with melee attacks.
How to level up: Combat on mobs and/or players.
Effect: Each level increases your melee damage.
⚡ Attack Speed
About: Increases how fast you can swing your weapon.
How to level up: Continuous combat on mobs and/or players.
Effect: Attack faster with weapons and tools.
🎯 Critical Chance
About: Increases your chance to deal critical hits.
How to level up: Land hits and attacks on mobs.
Effect: Each level increases the chances of critical damage.
💥 Critical Damage
About: Increases the damage when you land a critical hit.
How to level up: Land critical hits on enemies.
Effect: Critical hits deal significantly more damage.
🛡️ Defence
About: Increases your movement speed.
How to level up: Travel and move around the world.
Effect: Move faster in all directions.
🔥 Ferocity
About: Increases overall combat prowess and aggression.
How to level up: Engage in combat activities.
Effect: Boosts multiple combat-related bonuses.
🔮 Wisdom
About: Enhances magical abilities and special effects.
How to level up: Use special abilities and spells.
Effect: Increases effectiveness of magical effects.
🛡️ Defense
About: Reduces incoming damage from all sources.
How to level up: Take damage while wearing armor and survive.
Effect: Each level reduces physical damage taken.
❤️ Health
About: Increases your maximum health points.
How to level up: Survive with full health or heal frequently.
Effect: Each level grants additional HP.
Skill Hints!
Trading with other players is secure and straightforward thanks to our interactive trading menu. Here is everything you need to know to safely exchange items, money, and experience!
Starting a Trade
There are two easy ways to send a trade request to another player:
The other player will receive a notification and can choose to either accept or deny your request.
Adding Items and Currency
Once the trade is accepted, a secure GUI menu will open up.
|
Preview of trading menu |
You can also include currency and experience in your trade by clicking the icons at the bottom of the menu:
Confirming the Trade
At the top of the trade menu, you will see a red block.
Farming introduces a brand new crop system to Sapling, adding depth, variety, and progression to farming.
Watering Cans
Watering cans are custom game items that allow you to fill up the watering can and use them to water your crops to keep them healthy.
There are 4 types of watering cans:
Each watering can can be crafted in the crafting bench and each one includes a higher water capacity.
Copper Watering Can
Water Capacity: 3
Steel Watering Can
Water Capacity: 4
Gold Watering Can
Water Capacity: 5
Iridium Watering Can
Water Capacity: 6
Sprinklers
Sprinklers unlike the watering cans provide a semi-automated way to water multiple crops within set intervals making it easier to maintain large farms.
There are 3 types of sprinklers:
Each sprinkler can be crafted in the crafting bench and each one includes a higher water capacity.
Primitive Sprinkler
Water Capacity: 4
Quality Sprinkler
Water Capacity: 6
Modern Sprinkler
Water Capacity: 8 — Recipe not yet configured
Fertilizers
There are 3 types of fertilizers, each one boosts plant growth in a different way.
Speed Grow 1
+1 Growth Tier
4x Sugar · 4x Bone Meal · 1x Wheat
Speed Grow 2
+2 Growth Tier
4x Amethyst · 4x Bone Meal · 1x Speed Grow 1
Speed Grow 3
+3 Growth Tier
4x Gold · 4x Bone Meal · 1x Speed Grow 2
Yield Increase 1
+1 Yield Increase
4x Dirt · 4x Bone Meal · 1x Wheat Seed
Yield Increase 2
+2 Yield Increase
4x Gold · 4x Bone Meal · 1x Yield Increase 1
Yield Increase 3
+3 Yield Increase
4x Diamond · 4x Bone Meal · 1x Yield Increase 2
Retaining Soil 1
-10% Less Water Consumption
4x Wheat · 4x Bone Meal · 1x Dirt Block
Retaining Soil 2
-20% Less Water Consumption
4x Iron · 4x Dirt Block · 1x Retaining Soil 1
Retaining Soil 3
-30% Less Water Consumption
4x Diamond · 4x Dirt Block · 1x Retaining Soil 2
Our enchantments feature gives a fresh and exciting twist to your experience on Sapling. All without overcomplicating the gameplay. These enchants are made seamlessly with vanilla mechanics in mind.
How It Works
Custom enchantments are earned and applied the exact same way you already know from vanilla Minecraft, through your XP and the tools you use every day.
How to Obtain Custom Enchants
You can unlock custom enchantments through a variety of in-game methods:
Full Enchantment List
Want to see everything available? Check out the full list of custom enchants to plan your perfect build.
| Enchant | What does it do? | Applies to |
|---|---|---|
| Abrasion | Damages opponents armor. | Weapons |
| Adrenaline | Gains strength when defending entity attacks. | Armor |
| Alacrity | Allows you to use tools at a quicker speed. | Tools |
| Allurement | Gives chance to catch double loot while fishing. | Fishing Rods |
| Arctic Freeze | Chance to inflict slowness and cause bleeding to the opponent. | Swords, Axes |
| Freezing | Gives chance to freeze the attacker. | Swords, Axes |
| Ascend | Allows you to levitate. | Swords |
| Aura | Reduces damage taken by nearby players. | Armor |
| Blackout | Blinds your opponent. | Swords |
| Blast Mining | Mine blocks in a 3x3 area. | Pickaxes |
| Blaze Reaper | Boosts damage against nether creatures. | Pickaxes |
| Brightness | Chance to cause more damage to Warden in the dark. | Swords |
| Caffeinated | Chance to increase attack speed when sprinting. | Swords |
| Carve | Give damage to entities within a 3x3 blocks when you swing. | Swords |
| Charge | Launch yourself forward. | Swords |
| Contagion | Give chance to spawn a cloud of void where your arrow lands. | Bows |
| Criticals | Increase damage done with critical hit. | Swords |
| Cubism | Deal more damage to slimes and magma cubes. | Weapons, Bows |
| Curse of Breaklessness | Gives 40% chance to fail to break blocks. | Pickaxes, Swords, Axes |
| Curse of Harmlessness | Gives a chance for attacks to do nothing. | Swords |
| Double Blow | Chance to deal double damage. | Trident |
| Drain | Cause your opponent to drain. | Swords |
| End Affinity | Reduces damages dealt in the End. | Armor |
| Enderbone | Increases damage dealt to Enderman and End Dragons. | Weapons |
| Escape | Gain a short burst of speed after taking damage. | Boots |
| Experience | Chance to get more experience from ores. | Tools |
| Explosive | Chance for arrows to explode. | Bow |
| Feather Step | Chance to cancel fall damage. | Boots |
| Fishing | Increases damage dealt to low-health enemies. | Weapons |
| Fire Hook | The hook is on fire. | Fishing Rods |
| First Strike | Deal more damage to enemies at full health. | Weapons |
| Flashbang | Blind your opponent on hit. | Bows |
| Foraging | Chance to multiply drops from leaves. | Tools |
| Frost | Chance to freeze your opponent. | Bows |
| Getaway | Chance to gain more movement speed below 20% health when dealt with damage. | Armor |
| Haste | Allows you to swing your tools faster. | Tools |
| Incinerate | Boosts damage inflicted on Spiders. | Swords, Axes |
| Infernal Touch | Chance to smelt mined blocks. | Tools |
| Multi-Shot | Rain arrows over opponent. | Bow |
| Nether Affinity | Reduces damages received in the nether world. | Armor |
| Nether Prospector | Chance to multiply ancient debris drops. | Pickaxes |
| Ninja | Chance to deal more damage to enemy while sneaking. | Swords |
| Poisoned Hook | Poisons the hook. | Fishing Rods |
| Postpone | Chance to cause no knockback to mobs. | Swords |
| Ravenous | Chance to regain hunger while fighting. | Swords, Axes |
| Rebounding | Rebounds incoming damage back at your attacker. | Armor |
| Repel | Chance to drive your opponent backward. | Swords |
| Replenish | Restores crops back when you break them. | Hoes |
| Resonate | Take in enemy damage and send it back to them. | Armor |
| Rumble | Chance to damage back to all entities in a 3 block radius. | Armor |
| Scorching | Chance to ignite the attacker in flames. | Armor |
| Sharpness Hook | Deal damage with the hook. | Fishing Rod |
| Shura | Gives a bonus to critical damage when under half health. | Swords |
| Skull Crusher | Boosts damage inflicted on Skeletons. | Swords, Axes |
| Starvation | A chance to inflict the hunger effect on your opponent. | Weapons |
| Thor | Chance to strike lightning at the opponent. | Swords, Bow, Crossbow, Trident |
| Vanish | Chance to disappear for 3 seconds after taking damage. | Armor |
| Waterbone | Helps you get some air underwater. | Helmets |
| Zombie Crusher | Boosts damage inflicted on Zombies. | Swords |
Levels are a core part of the Sapling SMP experience! As you play, you earn EXP through everyday survival activities. Level up to unlock rewards and show off your progress on the server.
How to Gain EXP
You earn EXP automatically just by playing. There is no command needed — EXP is tracked in the background as you do the following activities:
Mining - Break ores to earn EXP. Rarer ores reward more:
Killing Monsters - Combat rewards scale with difficulty:
Other Activities:
Losing EXP
Dying - You lose 1–2 EXP on death. This is a small penalty to keep levels meaningful, so be careful out there!
Level-Up Rewards
Every time you level up, you automatically receive rewards in your inventory. Rewards improve as you reach higher levels.
Levels 1–5
Levels 6–8 (Mid)
Levels 9–11
Levels 12–13
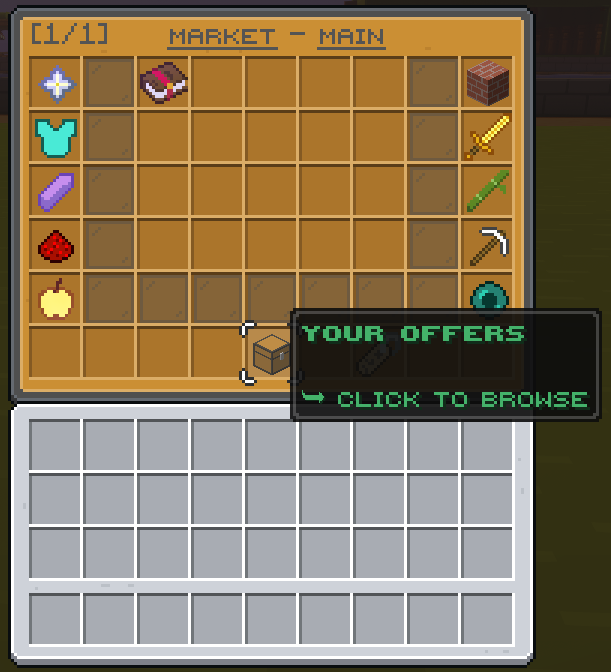
Player Market is the system our server uses to let players buy and sell items with each other through a simple and clean menu. It removes the need for chest shops and auctions.
What can you do with Player Markets?
Opening the Market
Use the command: /market
Selling an Item
Hold the item you want to sell and run the following command: /offer <price>
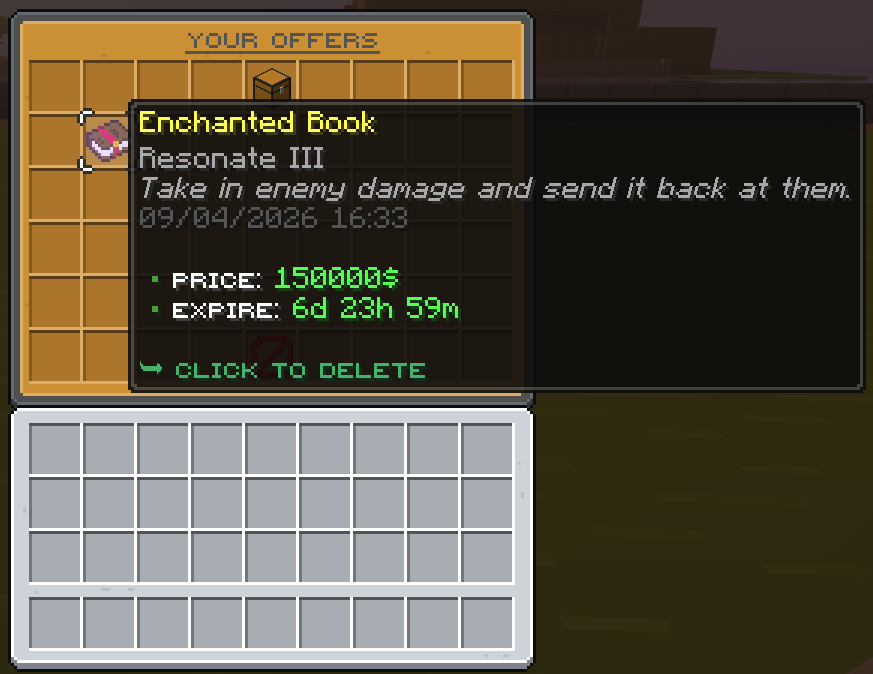
Deleting your Market Offer
|
Click on "Your Offers" |
Right-click the item to delete |
How to claim your Market pay
|
Click on "Your Offers" |
Click on the chest to claim your money |
Player Warps are custom teleport locations created by players, allowing anyone on the server to visit your spot at any time!
Creating a Player Warp
To set up your own warp at your current location, simply run:
Visiting a Player Warp
There are two easy ways to teleport to a player warp:
Deleting a Player Warp
If you ever want to remove your player warp, use the command:
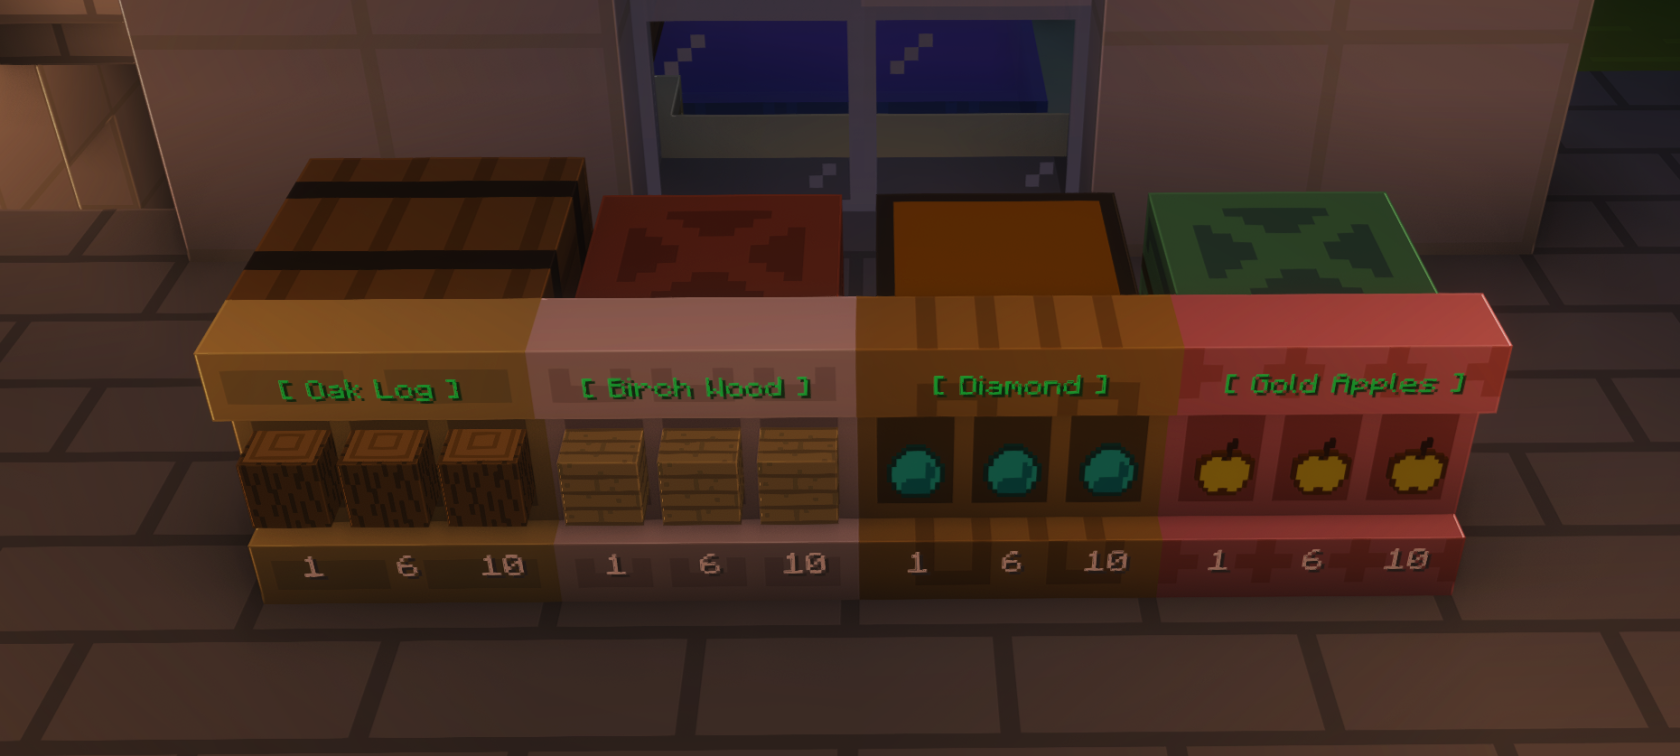
Player shops let you sell your items to other players using a Minecraft Shelf and a chest, barrel, or copper chest. Your container holds the stock, and the shelf becomes the shop that players can buy from.
How to create a shop
Player Shop Hints
The sapling referral system rewards both the player and player who was referred to the server.
How to Claim Referral Rewards
Got a friend to join? To claim your rewards, your friend simply needs to run the following command in-game: /referrals redeem <your username>.
Referral Commands
Standard Rewards
Milestones
| Referrals Needed | Rewards |
| 5 | $15,000 + 750 Saps + 1 Epic Key |
| 10 | $30,000 + 1,500 Saps + 1 Legend Key |
| 25 | $75,000 + 3,000 Saps + 2 Legend Keys |
| 50 | $150,000 + 6,000 Saps + 3 Legend Keys + 3 Epic Keys |
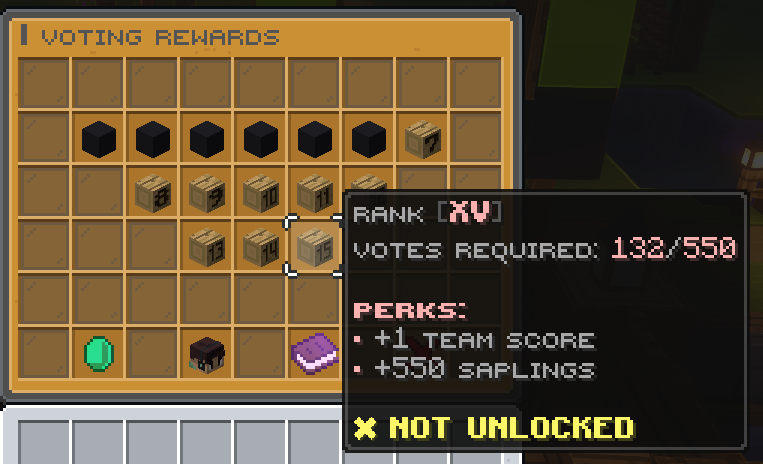
Voting is a simple and effective way to support Sapling and help our community grow by boosting our visibility on server lists.
How Voting Works
As you vote consistently, you progress through the Voting Ranks (starting at Vote Rank I) to unlock higher-tier perks like sell boosters and Sapling Coins. Even though your rank doesn't level up with every single vote, you still earn guaranteed base rewards each time you support the server.
Guaranteed Vote Rewards
How to Vote
Run the command /vote in-game and click the book icon to view the links
Visit the vote page on our website (sapling.gg/vote) to access all active voting sites directly
 |
|
If you play on the Bedrock or Console editions of Minecraft, you must add a period (.) before your username and replace any spaces with underscores on the voting sites.
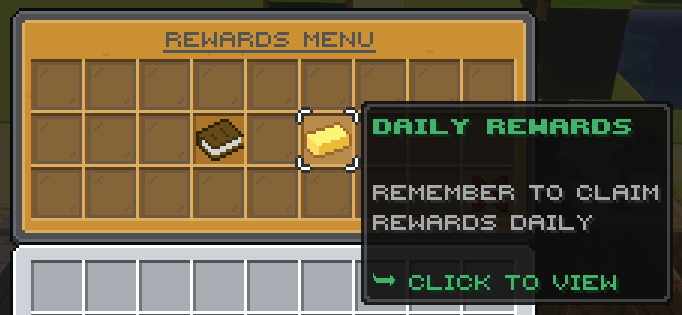
Daily rewards are free bonuses available to all players just for logging into the server each day. You can claim your daily rewards in two easy ways:
For Creators
Platform minimums:
Apply at: https://applications.sapling.gg
Applications reviewed by senior management. If you have any questions/concerns, don't hesitate to get touch via Discord.